
Although budgets can be tight, time demands are even tighter.
At a Glance
Now more than ever, it is important to know as quickly as possible whether a drill hole is improving your resources...
...or draining your drilling budget.
Faster data knowledge turnarounds are needed.
Why?
To determine geological and analytical properties so they can be included in a reserve model that can be used for mine planning on shorter than ever time frames.
This situation has produced a paradigm change on where we collect drilling data and how we view its value.
Previously discarded information is now considered essential because it can speed up our efforts to define geological and physical properties.
This is without the cost of transporting core samples to a laboratory.
Imagery is becoming a key component of this new approach.
Photographs have always been taken of core trays and sample cuttings.
To date, these images have only been captured as insurance for the future.
They are rarely considered valuable sources of immediate data.
Could they be?
Several companies are now starting to look into innovative ways to get new insight out of visual information.
They now see images as a valuable source of data that can be used to support a continuous modelling process.
Images are the new currency in today’s communications.
Technology is already very advanced in ways to manage and decode this information.
Machine learning algorithms are now available to automate processes that before were only attributed to humans.
We already have the necessary tools to start taking advantage of the great amount of visual information at our disposal and all we need is the final push for adoption to follow.
Ok, fair point, where do I start?
It starts with the ability to capture a good enough photograph of your core to be meaningful.
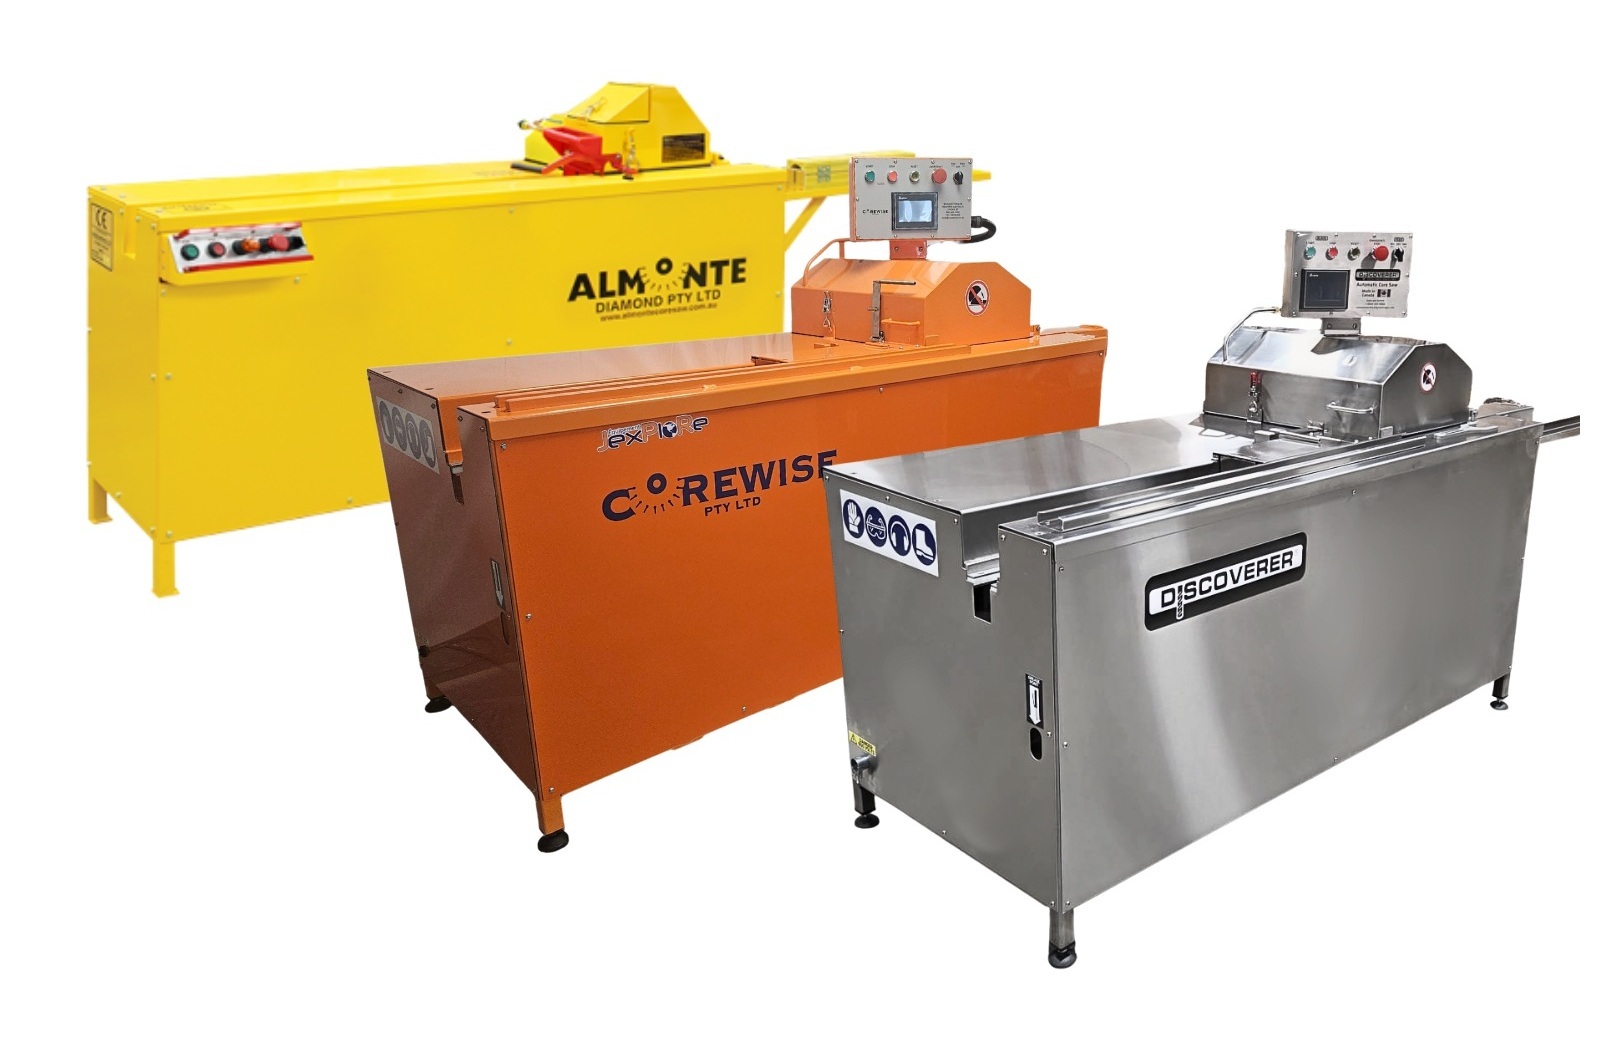
Let's explore 3 of the best core tray photography systems for your core shed on the market today.
The simplest and most basic solution:
This unit is the most budget option and a great place to start.
Benefits of this unit is that regardless of what core tray or core box you use, it can easily adapt to exactly the right size.
Ok, what's next?
This portable unit that is built to suit plastic core trays, but would be easily adapted to suit your current core box/tray.
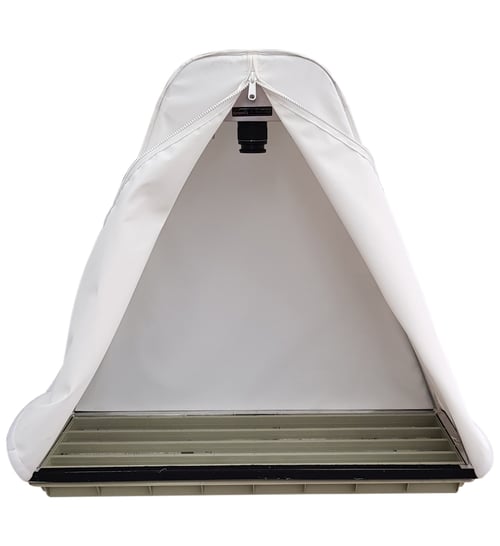
This 'fits' onto the perimeter of the tray, and eliminates the need to crop out a conflicting background.
The other benefit with this is that whether you are out in the sun or inside, you'll created a controlled environment with the canvas to capture pictures.
This white canvas works on the principle of using external light from the sun, or lighting in your core shed, and is diffused onto the core tray.
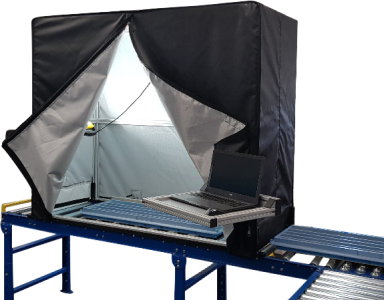
Now, ready to get really serious?
If you seriously believe in the value that your core tray images can deliver to your program, this could be for you.
This unit has been subject to 10,000+ hours of product development. Thanks to Dave Lyon at Saracen Gold Mines for his expertise in delivering this unit.

This is designed to be bolted onto roller racking in the core shed.
It's fitted out with an internal light source to achieve consistency with the core photography.
Roll the core trays into the unit, capture image, and roll it back out the other side.
Complete with swivel laptop tray, you can view and verify your images on the run without having to check the physical camera.
The final point on this unit is that it's completely flat pack, so it can easily be broken down and shipped anywhere in the world with ease.
So that's the crash course on the three best ways of capturing drill core photographs that fit your needs and budget.
So, if you've got images to a quality that you are happy with, how can you make use of them?
Getting Real Value From Your Diamond Core Images
Usually geos & field techs take pictures of the core using a smartphone or DSLR camera.
They then transfer those pictures to a file system organized hierarchically by project, drill hole number, and depth.
A workflow traditionally follows the steps below:
-
Use a smartphone or SLR camera
-
Take some pictures
-
Drop those pictures on your c:\ drive or Dropbox in some organized way
-
And then whenever someone needs access to them, they dive deep into the folder structure to find them
What about on large, long-term projects where thousands of feet of drill core are retrieved?
In this case, most people expect to capture thousands of feet of drill core with some level of image quality and data consistency.
So is the file repository system the best way of using this data?
Let's explore 7 benefits of using specialized core photography software over manual photo capture processes.
7 benefits of drill core photography software
1. Less time to capture and archive pictures of drill core
Let's do some quick math on the time involved to take a single drill core photograph and push that to a file management system using a conventional system comprised of a camera and a file sharing system such as Dropbox:
-
Frame the shot and take the picture – 10 sec
-
Transfer the image file to a PC – 20 sec
-
Rename the image file to a human-readable name – 10 sec
-
Transfer the image file to Dropbox (or similar file storage system) – 20 sec
Conservatively-speaking, it will take at least 1 minute for the entire process, per picture.
If each picture captures 5 metres of downhole drill core, then a 1,000m drill hole will consume 200 minutes of someone’s time, or 3.3 hours.
Note that this is just to take the picture, rename it to something that is human-readable, and store it somewhere where it is readily available to others.
Compare this to a process using software specifically designed for drill core photography:
-
Frame the shot and take the picture – 10 sec
-
Transfer the image file to a PC – 0 sec
-
Rename the image file to a human-readable name – 0 sec
-
Transfer the image file to Dropbox (or similar file storage system) – 0 sec

With dedicated software, the time required to do the same exact thing shrinks by 66%.
So what would typically take more than 3 hours to do using an ad-hoc process will take about 20 minutes using software tools like Imago.
This is because there is no need to do any manual file transfers or manual file naming: these are things that are handled programmatically by the software.
2. Better image consistency
Image Quality
If your organization is taking pictures of drill core without an imaging station, the image quality will suffer and vary widely between images.
An imaging station could be any of the options we explored above, that's designed to hold the camera and lighting in a fixed position relative to the drill core below it.
Every picture taken uses the same lighting and distance.
Here’s a good article about the 2 main types of imaging stations: Fixed v Mobile.
We've seen all sorts of 'build-it-yourself' options.
There will always be teams that want to have a go at building something on site.
If time is money, and you want a proven system that works, then you can get something off the shelf, as above.

Image Metadata
Drill core photography software capture metadata automatically.
It will load metadata such as the drill hole #, depth start, depth end, etc into each picture.
To do this manually requires you to edit each picture by hand.
Image Cropping
Sometimes drill core trays/boxes are not consistent.
So to adjust for variances with core tray/box sizes, or gaps in the drill core, a technician or geologist using a conventional/manual capture process will adjust their camera to fit the drill core into the picture.
But this type of adjustment will inevitably affect other aspects of the image.
And cropping the image manually after it is taken requires one to load the image into an image editing tool, edit as needed, and replace the original file with the edited one.
Image Filenames
Keeping filenames consistent means first coming up with a file naming convention, and then sticking to it.
Regardless of which geo or tech is taking the pictures and doing this work the conventional way.
It’s fairly easy for filenames to vary from person to person doing the work.
All of the above issues - image quality, metadata insertion, image cropping, and file naming conventions - are handled automatically by drill core photography software like Imago.
So inconsistencies and variability are minimized, regardless of the project, drill hole number, coreshed, or employee doing this work.
3. Easier sharing of drill core images (plus maintain centralized access to this information)
 Lets’ say that one of your geologists in one country has a question about a 3D model and wants to see a picture of the drill core from a particular drillhole and depth.
What do they do?
Most likely they will call/text someone in their org about their inquiry to find out first of all if there is imagery available, and if so, where they can go to retrieve it.
Then they will either wait to receive the imagery via email or text message/Whatsapp, or access it themselves if its available online to them (which usually is not).
If the imagery is not available, someone at the coreshed will be contacted.
The familiar conversation:
"Mate, can you find this core tray containing this drill core, take a picture of it, and then text/email the picture to me?"
With drill core photography software such as Imago, the geologist can retrieve the imagery on their own.
Even if they don’t have access to the software, a link to the specific imagery can be texted/emailed to the geologist.
It's no longer impacted by file size or internet bandwidth limitations.
Something to also keep in mind:
What happens to all that shared information in WhatsApp when an employee quits or is fired?
Does it disappear?
How do you keep tabs on that information?
Is unsecured data floating around in the big bad world of concern to you?
4. Easier to embed drill core imagery into 3D models

If you want to embed an image with a 3D model, you will have to upload the image into your model, or at least copy a shareable link from your file management system into the 3D model.
Since drill core photography software was designed to share imagery across various platforms, most of them benefit from direct integrations with all of the popular modelling tools such as:
- Leapfrog
- acQuire
- Deswik
- Datamine
- Vulcan
- Surpac
- Geosoft
5. View your imagery downhole and compare against other datasets in scaled view
Something that is not even achievable without hiring a dedicated staff cropping and stitching images is the ability to display your drill core imagery vertically in sequence.
Here’s a screenshot of the Imago portal displaying core boxes for a drill hole alongside the first core box displayed vertically.
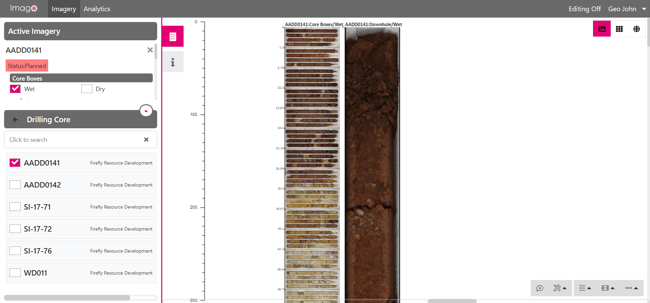
When you are able to view your drill core in vertical orientation, it is sometimes easier to interpret geologically. And when you can compare it against other drill holes and datasets, it makes it even easier to interpret.
6. Zoom in and out at the speed of Google Maps
Can your conventional tools zoom in and out with the ease and speed of Google Maps?
Not all drill core photography software can do this, but most if not all, have some sort of zoom feature that makes regular tools pale in comparison.
7. Get your geological data ready for AI and machine learning
Let’s face it.
Artificial intelligence and machine learning is here to stay, and only going to continue to improve.
At some point AI will be good enough to predict most things from imagery.
By starting now and getting all your imagery into a centralized system, the benefits you can derive at some point in the future will offset any pain experienced today.
Drill Core Photography Software Available Today
While we would highly recommend the Imago software, there are a few others now in the marketplace that you can check out.
Rather than summarize each, click the links below and give each an impartial look for yourself.
Spencer Dormer
My goal is to empower Geologists & Field Techs to make more informed decisions through providing unbiased and insightful thought leadership for the industry worldwide.